-
 ConfigurationalexsysTEAMCONTACTORDER TEAM
Once you have your SQL Server in place, and have the SQL client software installed on all Team Client PCs, you are ready to set up your Team Pro database.
The following basic steps are required for setting up your SQL Server and SQL Database.
Install Microsoft SQL Server v7.0 on to a server running Windows NT 4.0 Service Pack 4 or later.
Prior to running Team with SQL 7.0, you must make sure that the MS SQL 7.0 Client software is installed on all client PCs that will be running Team Pro for SQL 7.0.
Once the SQL Server is installed, use the Windows Start menu to select and start the SQL Enterprise Manager from the Microsoft SQL Server 7.0 program group to set up your SQL database.
Register Your SQL Server
To register your SQL Server:
1. Click on your Server Group to open the Getting Started Taskpad.
2. Select Administer SQL Server.
3. Select Register a Server, then use the Wizard to:
a. Enter your Server Name and select Add>.
b. Select the appropriate Authentication Mode (use the default).
c. Select the Server Group you want to register your server in.
Create the SQL Database
To create your SQL Database:
1. Expand your MS Server Tree to Databases on your server.
2. Right-click on Databases and select New Database.
3. In the General Tab, enter your database name (ie. teamlog).
4. Select the Data Files tab.
5. Enter an initial database size = 100 MB.
6. Select OK to create your database.
** you can use the defaults for all other settings when creating the database **
Create the SQL Database Login for Team
To create the SQL Database login for Team:
1. From the left browser panel, select the server.
2. Select the Security folder.
3. Right-click on Logins.
4. Select New Login…
5. From the General Tab, create a new login with:
Name = team (lowercase)
SQL Server Authentication = checked
Password = team
Database = teamlog
Language = (default)
6. Select OK.
Set Access and Permissions for the Database
To set proper access and permissions for the database:
1. From the left browser panel, select the Security folder, then:
a. Select Logins.
b. Right-click on the team login and select Properties.
c. Select the Database Access Tab.
d. Select the teamlog database, then select public for the access.
2. From the left browser panel, select the Databases folder, then:Right-click on the teamlog database and select Properties.
Select the Permissions Tab.
Select all the permissions for the team login as follows:
Create table
Create view
Create SP
Create Default
Create Rule
Backup DB
Backup Log
3. Select OK.
Test Your Connection Using Query Analyzer
Test your connection using the Windows Start menu to select and start the Query Analyzer from the Microsoft SQL Server 7.0 program group.
Once the program is started:
1. Select your server.
2. Select Use SQL Server authentication.
3. Enter the Login Name : team.
4. Enter the Password : team.
5. Select OK.
6. Once the connection is established, test it by entering the following command in the Query Tab:
select @@version
7. Select the Execute Query button (green arrow) and if you see information similar to:
Microsoft SQL Server 7.00 – 7.00.623 (Intel X86)
Nov 27 1998 22:20:07
Copyright (c) 1988-1998 Microsoft Corporation
Standard Edition in Windows NT 4.0 (Build 1381: Service Pack 4)
Your connection is good.
Connect Team To Your SQL Database
To connect Team to your SQL Database:
1. Select Admin | Database Utility from the TeamView or Work Request menus or start TEAM Database Utility from the Alexsys Team Program Group to open the Alexsys Team Database Utility. Remember to log off of Team after you open the Database Utility.
2. Select the SQL Setup category from the Alexsys Team Database Utility window (see figure below).
Alexsys Team Database Utility – SQL Setup
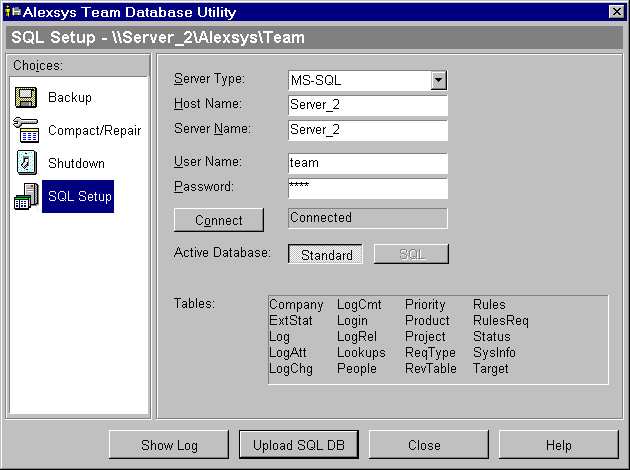
3. Select the Server Type (i.e. MS-SQL).
4. Enter the Host Name (i.e. Server_2).
5. Enter the Server Name (i.e. Server_2).
6. Enter the Database Name (i.e. Log).
7. Enter the User Name (i.e. team in lowercase).
8. Enter the Password.
9. Select the Connect button.
If Team can connect to your SQL database on the SQL server, Connected will be displayed in the area next to the Connect button.
Upload Your Existing Team Database to SQL
When you are ready to run Team using your SQL database, you must connect Team to the SQL server and upload your database to SQL. Once this is done and you do one final test to check your connection to SQL using Team, you can force all users to run Team Pro by switching the active database to SQL.
To connect to the SQL database and upload your existing data:
1. Select Admin | Database Utility from the TeamView or Work Request menus or start TEAM Database Utility from the Alexsys Team Program Group to open the Alexsys Team Database Utility. Remember to log off of Team after you open the Database Utility.
2. Select the SQL Setup category from the Alexsys Team Database Utility window.
3. Select the Connect button.
4. Once connected, select the Upload to SQL button to upload your existing standard Team database to your SQL database.
You must be running with the Standard database as the active database in order to upload your database to SQL. You do not want to make SQL your active database at this time.
5. Once uploaded, select Cancel to close the Alexsys Team Database Utility.
Test Your Connection to Team Pro
Once you have uploaded your SQL database using the SQL Setup Utility, you can perform another test using Team without forcing all users to run SQL:
1. Alter the Team shortcut on your desktop by adding an /SQL parameter to the Target in the shortcut properties. (i.e. “C:\Program Files\Alexsys\Team\Team.exe” /SQL)
2. Start Team.
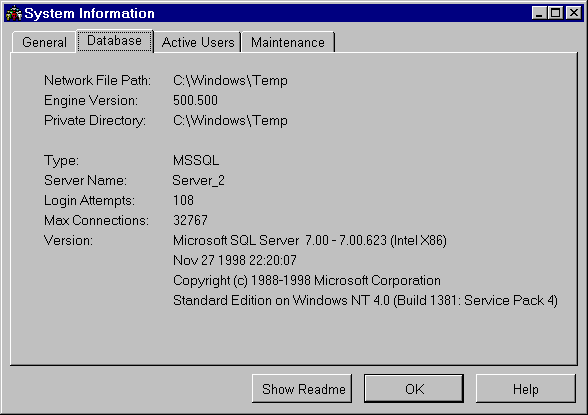
3. Verify that Team is accessing the SQL database by selecting Help | System Information from the TeamView menu and selecting the Database Tab (see figure below). You should see information for the SQL server you are accessing.
System Information – Database Tab – SQL Information Displayed
Make SQL the Active Database
Once your database has been uploaded to your SQL database and you have tested your connection to your SQL database using Team Pro, you can make SQL the active database to force all users to use Team Pro.
To make SQL the active database:
1. Select Admin | Database Utility from the TeamView or Work Request menus or start TEAM Database Utility from the Alexsys Team Program Group to open the Alexsys Team Database Utility. Remember to log off of Team after you open the Database Utility.
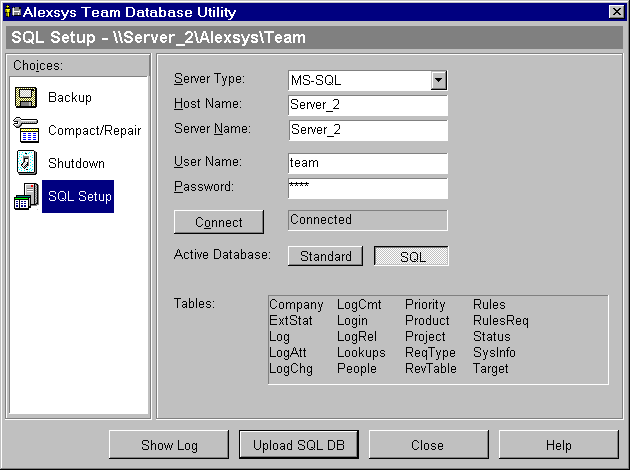
2. Select the SQL Setup category from the Alexsys Team Database Utility window.
3. Connect to the SQL database by selecting the Connect button.
4. Once connected, select SQL as the Active Database (see figure below).
Alexsys Team Database Utility – SQL Active Database
5. Select Close to close the Alexsys Team Database Utility.
6. Since SQL is now the active database, you can remove the /SQL argument from any Team shortcuts.
Install Microsoft SQL Server 2000 on your server.
Prior to running Team with SQL 2000, you must make sure that the MS SQL 2000 Client software is installed on all client PCs that will be running Team Pro for SQL 2000 and that you have the proper SQL licensing.
Once the SQL Server is installed, use the Windows Start menu to select and start the SQL Server Enterprise Manager from the Microsoft SQL Server program group to set up your SQL database.
Create the SQL Database
To create your SQL Database:
1. Expand your MS Server Tree to Databases on your server.
2. Right-click on Databases and select New Database.
3. In the General Tab, enter your database name (ie. teamlog).
4. Select the Data Files tab.
6. Enter an initial database size = 100 MB.
6. Select OK to create your database.
** you can use the defaults for all other settings when creating the database **
Create the SQL Database Login for Team
To create the SQL Database login for Team:
1. Select the Security folder from the SQL Server tree
2. Right-click on Logins.
3. Select New Login…
4. In the General Tab, create a new login with:
Name = team (lowercase)
SQL Server Authentication = checked
Password = team
Database = teamlog
Language = (default)
5. Select OK to create the login.
Set Access and Permissions for the Database
To set proper access and permissions for the database:
1. Select the Database Access tab.
2. Select the teamlog database (check this database).
3. Select OK.
4. Enter your password (i.e. team).
5. Select the Database folder from the SQL Server tree.
6. Right-click on teamlog database and select Properties.
7. Select the Permissions Tab.
8. Select permissions for the team login as follows:
Create table
Create view
Create SP
Create Default
Create Rule
Create Function
Backup DB
Backup Log
9. Select OK.
Test Your Connection Using Query Analyzer
Test your connection using the Windows Start menu to select and start the Query Analyzer from the Microsoft SQL Server program group.
Once the program is started:
1. Select your server.
2. Select Use SQL Server authentication.
3. Enter the Login Name: team.
4. Enter the Password : team.
5. Select OK.
6. Once the connection is established, test it by entering the following command in the Query Tab:
select @@version
7. Select the Execute Query button (green arrow) and if you see information similar to:
Microsoft SQL Server 2000 – 8.00.194 (Intel X86)
Aug 6 2000 00:57:48
Copyright (c) 1988-2000 Microsoft Corporation
Standard Edition on Windows NT 5.0 (Build 2195: Service Pack 1)
Your connection is good.
Connect Team To Your SQL Database
To connect Team to your SQL Database:
1. Select Admin | Database Utility from the TeamView or Work Request menus or start TEAM Database Utility from the Alexsys Team Program Group to open the Alexsys Team Database Utility. Remember to log off of Team after you open the Database Utility.
2. Select the SQL Setup category from the Alexsys Team Database Utility window (see figure below).
Alexsys Team Database Utility – SQL Setup
3. Select the Server Type (i.e. MS-SQL).
4. Enter the Host Name (i.e. Server_2).
5. Enter the Server Name (i.e. Server_2).
6. Enter the Database Name (i.e. Log).
7. Enter the User Name (i.e. team in lowercase).
8. Enter the Password.
9. Select the Connect button.
If Team can connect to your SQL database on the SQL server, Connected will be displayed in the area next to the Connect button.
Upload Your Existing Team Database to SQL
When you are ready to run Team using your SQL database, you must connect Team to the SQL server and upload your database to SQL. Once this is done and you do one final test to check your connection to SQL using Team, you can force all users to run Team Pro by switching the active database to SQL.
To connect to the SQL database and upload your existing data:
1. Select Admin | Database Utility from the TeamView or Work Request menus or start TEAM Database Utility from the Alexsys Team Program Group to open the Alexsys Team Database Utility. Remember to log off of Team after you open the Database Utility.
2. Select the SQL Setup category from the Alexsys Team Database Utility window.
3. Select the Connect button.
4. Once connected, select the Upload to SQL button to upload your existing standard Team database to your SQL database.
You must be running with the Standard database as the active database in order to upload your database to SQL. You do not want to make SQL your active database at this time.
5. Once uploaded, select Cancel to close the Alexsys Team Database Utility.
Test Your Connection to Team Pro
Once you have uploaded your SQL database using the SQL Setup Utility, you can perform another test using Team without forcing all users to run SQL:
1. Alter the Team shortcut on your desktop by adding an /SQL parameter to the Target in the shortcut properties. (i.e. “C:\Program Files\Alexsys\Team\Team.exe” /SQL)
2. Start Team.
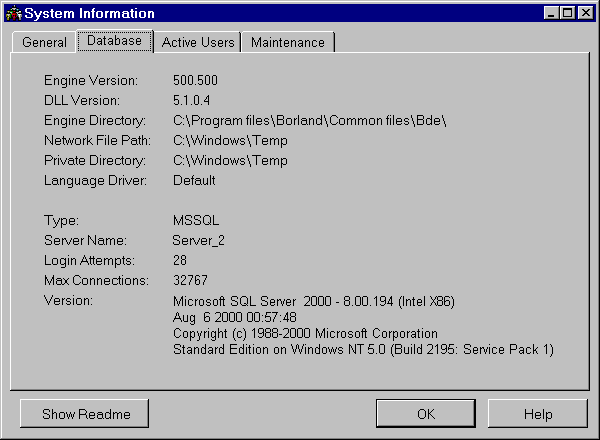
3. Verify that Team is accessing the SQL database by selecting Help | System Information from the TeamView menu and selecting the Database Tab (see figure below). You should see information for the SQL server you are accessing.
System Information – Database Tab – SQL Information Displayed
Make SQL the Active Database
Once your database has been uploaded to your SQL database and you have tested your connection to your SQL database using Team Pro, you can make SQL the active database to force all users to use Team Pro.
To make SQL the active database:
1. Select Admin | Database Utility from the TeamView or Work Request menus or start TEAM Database Utility from the Alexsys Team Program Group to open the Alexsys Team Database Utility. Remember to log off of Team after you open the Database Utility.
2. Select the SQL Setup category from the Alexsys Team Database Utility window.
3. Connect to the SQL database by selecting the Connect button.
4. Once connected, select SQL as the Active Database (see figure below).
Alexsys Team Database Utility – SQL Active Database
5. Select Close to close the Alexsys Team Database Utility.
6. Since SQL is now the active database, you can remove the /SQL argument from any Team shortcuts.
Create the SQL Database Login for Team
To create the SQL Database login for Team:
1. Select the Security folder from the SQL Server tree
2. Right-click on Logins
3. Select New Login…
4. In the General Tab, create a new login with:
Name = team (lowercase)
SQL Server Authentication = checked
Password =
Database = master
Language = (default)
5. Select OK to create the login.
Create the SQL Database
To create your SQL Database:
1. Select the Databases folder from the SQL Server Tree.
2. Right-click on Databases and select New Database.
3. In the General Page, create the database with:
Database Name = teamlog
Owner =
Initial Size (MB) = 100
4. Select OK to create your database.
Note: You can use the defaults for all other settings when creating the database.
Create the Team Schema and Database User
To create the schema and database user:
1. Select the Databases folder from the SQL Server Tree and expand to show databases.
2. Select the team database (i.e. teamlog) and expand.
3. Select the Security folder and expand.
4. Right-click on Users and select New User.
5. In the General Page, enter the following:
User name = team
Login name = team
Default Schema = team
6. Select OK to save.
7. Still under the Security folder, select Schemas.
8. Right-click on Schemas and select New Schema.
9. On the General Page, enter the following:
Schema name = team
Schema owner = team
10. Select OK to save.
Set Access and Permissions for the Database
To set proper access and permissions for the database:
1. Select the Databases folder from the SQL Server tree.
2. Right-click on the teamlog database and select Properties.
3. On the Permissions Page, grant the following Permissions for the team user:
Connect
Create table
Delete
Execute
Insert
Select
Update
4. Select OK.
Set the Default Database for the Team User
To set the default database for the Team user:
1. Select the Security folder from the SQL Server Tree.
2. Select Logins.
3. Right-click on the team login and select Properties.
4. On the General Page, set the Default database to teamlog.
5. On the User Mapping Page, verify that the following are set:
• the teamlog database should be selected
• the User should be set to team
• the Default Schema should be set to team
• public should be the only membership selected in the Database role Membership settings
6. Select OK to save changes.
Test Your Connection Using the Server Management Studio
Test your connection using the Microsoft SQL Server Management Studio as follows:
1. Run the Microsoft SQL Server Management Studio and login using your team login.
2. Select the server corresponding to your team login.
3. Select New Query from the toolbar.
4. Enter the following command in the Query Tab:
select @@version
5. Select Execute from the toolbar and if you see information similar to:
Microsoft SQL Server 2005 – 9.00.1399.06 (Intel X86)
Oct 14 2005 00:33:37
Copyright (c) 1988-2005 Microsoft Corporation
Standard Edition on Windows NT 5.1 (Build 2600: Service Pack 2)
Your connection is good.
Connect Team To Your SQL Database and Upload Your Data
To connect Team to your SQL Database:
1. Select TEAM Database Utility from the Alexsys Team Program Group or run TeamAdm.exe in the Alexsys Team server directory to open the Alexsys Team Database Utility.
2. Login using the Team ADMIN User ID and password.
3. Select the SQL Setup category.
4. Select the Server Type (i.e. Microsoft SQL via ADO).
5. Enter the Host Name.
6. Enter the Server Name.
7. Enter the User Name.
8. Enter the Password.
9. Select the Connect button.
10. Once connected, select Upload to SQL to upload your existing standard Team database to your SQL database.
11. Once uploaded, select Close to close the Alexsys Team Database Utility.
Tip: You must be running with the Standard database as the active database in order to upload your database to SQL. You do not want to make SQL your active database at this time.
Test Your Connection to SQL
Once you have uploaded your SQL database using the SQL Setup Utility, you can perform another test using Team without forcing all users to run SQL:
1. Alter the Team shortcut on your desktop by adding an /SQL parameter to the Target in the shortcut properties. (i.e. “C:\Program Files\Alexsys\Team\Team.exe” /SQL)
2. Start Team.
3. Verify that Team is accessing the SQL database by selecting Help | System Information from the TeamView menu and selecting the Database Tab. You should see information for the SQL server you are accessing, similar to the figure below.
System Information – Database Tab – SQL Information Displayed
http://alexsys.team/wp-content/uploads/2017/12/dbinfosql2000.gif
Make SQL the Active Database
Once your database has been uploaded to your SQL database and you have tested your connection to your SQL database using Team Pro, you can make SQL the active database to force all users to use Team Pro.
To make SQL the active database:
1. Select TEAM Database Utility from the Alexsys Team Program Group or run TeamAdm.exe in the Alexsys Team server directory to open the Alexsys Team Database Utility.
2. Login using the Team ADMIN User ID and password.
3. Select the SQL Setup category.
4. Connect to the SQL database by selecting the Connect button.
5. Once connected, select SQL as the Active Database.
6. Select Close to close the Alexsys Team Database Utility.
7. Since SQL is now the active database, you can remove the /SQL argument from any Team shortcuts.
General Instructions
Once you have your MySQL Server in place, and have the MySQL client software installed on all Team Client PCs, you are ready to set up your Team-SQL database.
The following basic steps are required for setting up your SQL Server and SQL Database:
• Create the SQL Database and Set Permissions
• Test Your Connection using the ODBC Data Source Administrator
• Connect Team to Your SQL Database and Upload Your Data
• Test Your Connection to Team-SQL
• Make SQL the Active Database
Create the SQL Database and Set Permissions
To create the SQL Database:
1. Run mysql by running C:\mysql\bin\mysql.exe
2. From the mysql> prompt, enter:
create database team;
3. From the mysql> prompt, enter:
grant all on team.* to ‘team’@’%’ identified by ‘team’;
4. From the mysql> prompt, enter:
flush privileges;
Test Your Connection using the ODBC Data Source Administrator
To test your connection:
1. Use the Windows Control Panel and select Administrative Tools.
2. Select Data Sources (ODBC) to run the ODBC Data Source Administrator.
3. Select the Drivers tab and confirm that MySQL ODBC Driver is there. (If not, you will have to download and install the latest ODBC driver from http://www.mysql.com/products)
4. Select the User DSN tab.
5. Select Add.
6. Select MySQL ODBC Driver.
7. Select Finish and enter the following:
Database Name = team
User = team
Password =
8. Select Test Data Source and if you see information similar to:
Data Source “Connected Successfully to ‘mysqld-4.1.2-alpha-nt’ !!!
Your connection is good.
Connect Team to Your SQL Database and Upload Your Data
To connect Team to your SQL Database:
1. Select TEAM Database Utility from the Alexsys Team Program Group or run TeamAdm.exe in the Alexsys Team server directory to open the Alexsys Team Database Utility.
2. Login using the Team ADMIN User ID and password.
3. Select the SQL Setup category.
4. Select the Server Type (i.e. MySQL via ADO).
5. Enter the Host Name.
6. Enter the Server Name.
7. Enter the User Name.
8. Enter the Password.
9. Select the Connect button.
10. Once connected, select Upload to SQL to upload your existing standard Team database to your SQL database.
11. Once uploaded, select Close to close the Alexsys Team Database Utility.
Tip: You must be running with the Standard database as the active database in order to upload your database to SQL. You do not want to make SQL your active database at this time.
Note: When uploading your Standard Team database to your MySQL database, if the upload fails while uploading any table that includes BLOBs (i.e. the LogAtt table) try increasing the Max Allowed Packet settings to 16MB.
If you have to change these settings, remember to Restart your MySQL Service.
Test Your Connection to Team-SQL
Once you have uploaded your SQL database using the SQL Setup Utility, you can perform another test using Team without forcing all users to run SQL:
1. Alter the Team shortcut on your desktop by adding an /SQL parameter to the Target in the shortcut properties. (i.e. “C:\Program Files\Alexsys\Team\Team.exe” /SQL)
2. Start Team.
3. Verify that Team is accessing the SQL database by selecting Help | System Information from the TeamView menu and selecting the Database Tab. You should see information for the SQL server you are accessing.
Make SQL the Active Database
Once your database has been uploaded to your SQL database and you have tested your connection to your SQL database using Team-SQL, you can make SQL the active database to force all users to use Team-SQL.
To make SQL the active database:
1. Select TEAM Database Utility from the Alexsys Team Program Group or run TeamAdm.exe in the Alexsys Team server directory to open the Alexsys Team Database Utility.
2. Login using the Team ADMIN User ID and password.
3. Select the SQL Setup category.
4. Connect to the SQL database by selecting the Connect button.
5. Once connected, select SQL as the Active Database.
6. Select Close to close the Alexsys Team Database Utility.
7. Since SQL is now the active database, you can remove the /SQL argument from any Team shortcuts.
General Instructions
Once you have your MySQL Server in place, and have the MySQL client software installed on all Team Client PCs, you are ready to set up your Team-SQL database.
The following basic steps are required for setting up your SQL Server and SQL Database:
• Create the SQL Database
• Create the SQL Database User and Set Permissions
• Test Your Connection using the ODBC Data Source Administrator
• Connect Team to Your SQL Database and Upload Your Data
• Test Your Connection to Team-SQL
• Make SQL the Active Database
Create the SQL Database and Set Permissions
To create the SQL Database:
1. Run MySQL Command Line Client
2. From the mysql> prompt, enter:
create database team;
Create the SQL Database User and Set Permissions
To create your SQL database user and set permissions:
1. Run MySQL Administrator.
2. Select User Administration.
3. Select the New User button below the User Information Tab.
4. Enter the following information in the User Information Tab:
MySQL User = team
Password =
Confirm Password =
5. Select Apply Changes.
6. Select the Schema Privileges Tab.
7. Select your team Schemata.
8. Select << to grant full access for the team user.
9. Select Apply Changes.
Test Your Connection using the ODBC Data Source Administrator
To test your connection:
1. Use the Windows Control Panel and select Administrative Tools.
2. Select Data Sources (ODBC) to run the ODBC Data Source Administrator.
3. Select the Drivers tab and confirm that MySQL ODBC Driver is there. (If not, you will have to download and install the latest ODBC driver from http://www.mysql.com/products)
4. Select the User DSN tab.
5. Select Add.
6. Select MySQL ODBC Driver.
7. Select Finish and enter the following:
Database Name = team
User = team
Password =
8. Select Test and if you see information similar to:
Success; connection was made!
Your connection is good.
Connect Team to Your SQL Database and Upload Your Data
To connect Team to your SQL Database:
1. Select TEAM Database Utility from the Alexsys Team Program Group or run TeamAdm.exe in the Alexsys Team server directory to open the Alexsys Team Database Utility.
2. Login using the Team ADMIN User ID and password.
3. Select the SQL Setup category.
4. Select the Server Type (i.e. MySQL via ADO).
5. Enter the Host Name.
6. Enter the Server Name.
7. Enter the User Name.
8. Enter the Password.
9. Select the Connect button.
10. Once connected, select Upload to SQL to upload your existing standard Team database to your SQL database.
11. Once uploaded, select Close to close the Alexsys Team Database Utility.
Tip: You must be running with the Standard database as the active database in order to upload your database to SQL. You do not want to make SQL your active database at this time.
Note: When uploading your Standard Team database to your MySQL database, if the upload fails while uploading any table that includes BLOBs (i.e. the LogAtt table) try increasing the Max Allowed Packet settings to 16MB.
If you have to change these settings, remember to Restart your MySQL Service.
Test Your Connection to Team-SQL
Once you have uploaded your SQL database using the SQL Setup Utility, you can perform another test using Team without forcing all users to run SQL:
1. Alter the Team shortcut on your desktop by adding an /SQL parameter to the Target in the shortcut properties. (i.e. “C:\Program Files\Alexsys\Team\Team.exe” /SQL)
2. Start Team.
3. Verify that Team is accessing the SQL database by selecting Help | System Information from the TeamView menu and selecting the Database Tab. You should see information for the SQL server you are accessing.
Make SQL the Active Database
Once your database has been uploaded to your SQL database and you have tested your connection to your SQL database using Team-SQL, you can make SQL the active database to force all users to use Team-SQL.
To make SQL the active database:
1. Select TEAM Database Utility from the Alexsys Team Program Group or run TeamAdm.exe in the Alexsys Team server directory to open the Alexsys Team Database Utility.
2. Login using the Team ADMIN User ID and password.
3. Select the SQL Setup category.
4. Connect to the SQL database by selecting the Connect button.
5. Once connected, select SQL as the Active Database.
6. Select Close to close the Alexsys Team Database Utility.
7. Since SQL is now the active database, you can remove the /SQL argument from any Team shortcuts.
Oracle 8.05, 8i, 9i and 10g instructions can also be downloaded as a PDF.
Once you have your Oracle Server in place, and have the SQL client software installed on all Team Client PCs, you are ready to set up your Team Pro for Oracle database.
When running Team Pro for Oracle, it is important to know that the lookup field values are all case sensitive.
The following basic steps are required for setting up your SQL Server and SQL Database.
• Requirements,
• Create the Table Space,
• Create the SQL Database Login and Permissions for Team,
• Test Your Client PC’s Connection Using Net8 Easy Config,
• Connect Team to Your SQL Database,
• Upload Your Existing Team Database to SQL,
• Test Your Connection to Team Pro, and
• Make SQL the Active Database.
Requirements
• Oracle 8.05 server or later.
• Oracle 8.05 Client or later (version should match database version) on ALL PC’s that will access this database.
• Minimum of 300 MB of disk storage for Team tables.
Create the Table Space
To create the Oracle table space for Team:
1. Using the Oracle Storage Manager, create a Table Space for Team called TEAMDB.
2. Select the following size and growth option settings:
General:
| General: | |
| Setting: | Value: |
| Name: | TEAMDB |
| Status: | Online |
| Datafiles: | D:\ORACLEDB\TEAMDB (Site Specific) |
| Type: | Permanent |
| Extents: | |
| Setting: | Value: |
| Initial Size: | 1024K |
| Next Size: | 1024K |
| Minimum Size: | 0 |
| Increase by: | 50% |
| Minimum Number: | 1 |
| Maximum Number: | Unlimited (radio button) |
Create the SQL Database Login and Permissions for Team
Create one login that will be used by Team to connect to the database. Team manages its users internally. Team users are not aware of the database connection process. Team connects to the Oracle database using the user established during initial setup. On startup, Team connects to Oracle and logs in using the dedicated Team login. After Database connection and login, Team then presents Team’s login screen. The user is validated within Team and is then permitted to proceed if the UserID and Login are correct.
To create the login and set permissions for Team:
1. Using the Oracle Security Manager, create a login called TEAM.
2. Team needs full access to create, delete, alter, read and write tables. Here are the recommended settings:
| General | |
| Setting: | Value: |
| Name: | TEAM |
| Profile: | DEFAULT |
| Authentication: | Password |
| Password: | (choose one) |
| Expire Password Now: | unchecked |
| Table Spaces: | |
| Setting: | Value: |
| Default: | TEAMDB |
| Temporary: | TEAMDB |
| Status | unlocked |
| Roles / Privileges: | |
| Privilege Type:Roles | |
| Granted: | |
| CONNECT: | Admin Option Checked Default Checked |
| DBA: | Admin Option Checked Default Checked |
| EXP_FULL_DATABASE: | Admin Option Checked Default Checked |
| HS_ADMIN_ROLE: | Admin Option Checked Default Checked |
| RESOURCE: | Admin Option Checked Default Checked |
| Privilege Type:System Privileges | |
| Granted: | |
| ALTER DATABASE | Admin Option Checked |
| CREATE ANY TYPE | Admin Option Checked |
| UNLIMITED TABLESPACE | Admin Option Checked |
| UPDATE ANY TABLE | Admin Option Checked |
| Object Privileges | |
| No changes made | |
| Quotas | |
| None set |
Test Your Client PC’s Connection Using Net8 Easy Config
To check that you can connect to your Oracle server, without running Team:
1. Run the Oracle Net8 Easy Config from the Oracle for Windows 95 program group from a client PC.
2. Select Test as your Action.
3. Select your service (i.e. TEAM.WORLD).
4. Select the Next > button.
5. Enter your database logon information:
For example:
Username team
Password team
6. Select the Test button.
7. If everything is configured properly, you will have a connection test that is successful.
8. Select the Done button.
9. Select the Finish button to complete your test and exit the Net8 Easy Config program.
Connect Team To Your SQL Database
To connect Team to your SQL Database:
1. Select Admin | Database Utility from the TeamView or Work Request menus or start TEAM Database Utility from the Alexsys Team Program Group to open the Alexsys Team Database Utility. Remember to log off of Team after you open the Database Utility.
2. Select the SQL Setup category from the Alexsys Team Database Utility window (see figure below).
Alexsys Team Database Utility – SQL Setup
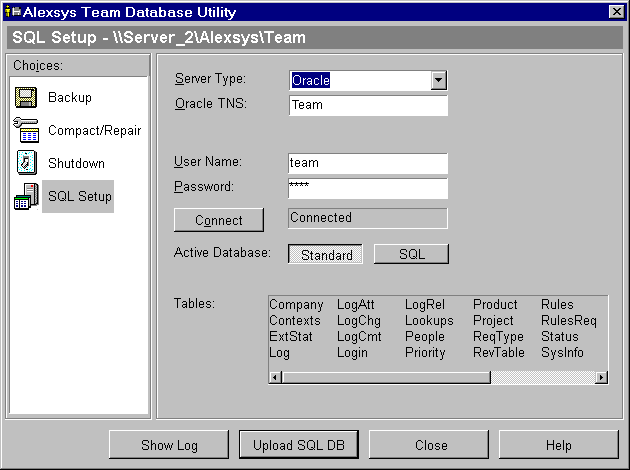
3. Select the Server Type (i.e. Oracle).
4. Enter the Oracle TNS (i.e. Team).
5. Enter the User Name (i.e. team in lowercase).
6. Enter the Password.
7. Select the Connect button.
If Team can connect to your SQL database on the SQL server, Connected will be displayed in the area next to the Connect button.
Upload Your Existing Team Database to SQL
When you are ready to run Team using your SQL database, you must connect Team to the SQL server and upload your database to SQL. Once this is done and you do one final test to check your connection to SQL using Team, you can force all users to run Team Pro by switching the active database to SQL.
To connect to the SQL database and upload your existing data:
1. Select Admin | Database Utility from the TeamView or Work Request menus or start TEAM Database Utility from the Alexsys Team Program Group to open the Alexsys Team Database Utility. Remember to log off of Team after you open the Database Utility.
2. Select the SQL Setup category from the Alexsys Team Database Utility window.
3. Select the Connect button.
4. Once connected, select the Upload to SQL button to upload your existing standard Team database to your SQL database.
You must be running with the Standard database as the active database in order to upload your database to SQL. You do not want to make SQL your active database at this time.
5. Once uploaded, select Cancel to close the Alexsys Team Database Utility.
Test Your Connection to Team Pro
Once you have uploaded your SQL database using the SQL Setup Utility, you can perform another test using Team without forcing all users to run SQL:
1. Alter the Team shortcut on your desktop by adding an /SQL parameter to the Target in the shortcut properties.
2. (i.e. “C:\Program Files\Alexsys\Team\Team.exe” /SQL)
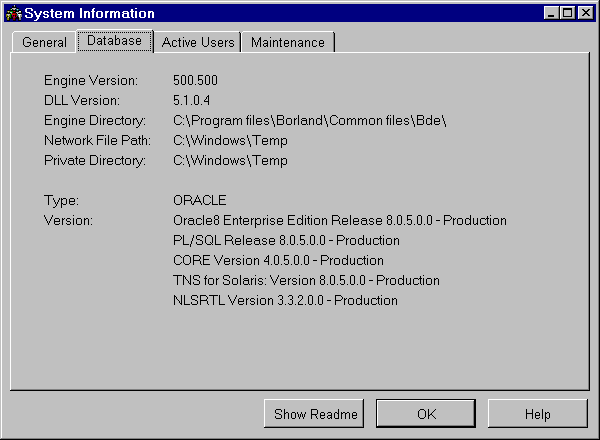
3. Start Team.
4. Verify that Team is accessing the SQL database by selecting Help | System Information from the TeamView menu and selecting the Database Tab (see figure below). You should see information for the SQL server you are accessing.
System Information – Database Tab – Oracle Information Displayed
Make SQL the Active Database
Once your database has been uploaded to your SQL database and you have tested your connection to your SQL database using Team Pro, you can make SQL the active database to force all users to use Team Pro.
Make SQL the active database
1. Select Admin | Database Utility from the TeamView or Work Request menus or start TEAM Database Utility from the Alexsys Team Program Group to open the Alexsys Team Database Utility. Remember to log off of Team after you open the Database Utility.
2. Select the SQL Setup category from the Alexsys Team Database Utility window.
3. Connect to the SQL database by selecting the Connect button.
4. Once connected, select SQL as the Active Database (see figure below).
Alexsys Team Database Utility – SQL Active Database
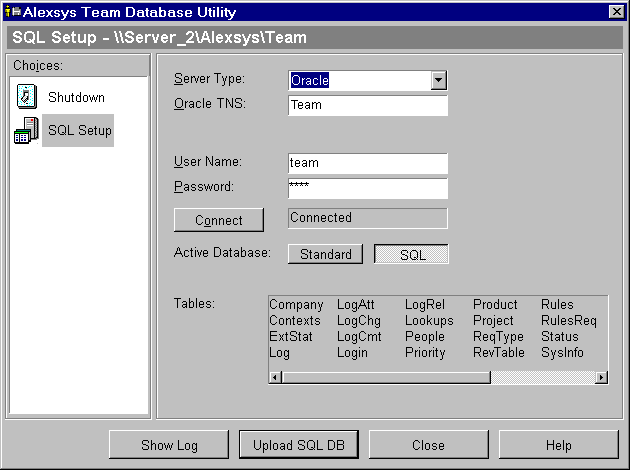
5. Select Close to close the Alexsys Team Database Utility.
6. Since SQL is now the active database, you can remove the /SQL argument from any Team shortcuts.

